The following buttons are available on the main scheduler page.
New ScanThis button duplicates the currently selected scan and inserts it as the next scan in the schedule, and moving all subsequent scans down by one. The duplicated scan will however have its
CalCodereset.DeleteThis button deletes the currently selected scan, and moves all subsequent scans up by one.
Search CalThis button initiates a search through the ATCA calibrator database for calibrators within 20 degrees of the position of the currently selected scan, with a flux density greater than 125 mJy in the frequency band you have specified. The results of this search are displayed to the right of the scan parameters, and are sorted by distance to the selected scan's position. Each calibrator returned by this search can be viewed in detail by clicking the button next to the calibrator's name, and it can be inserted at the currently selected position in the schedule by clicking on the button twice in succession.
Please note that after clicking the source name button, it can take up to a minute before the detailed flux density history of the source is shown, although it is usually significantly faster than that.
Pick SourceClick this button to load in a file from your own computer containing sources that will be used in the schedule. After clicking on this button, a new frame will appear next to this button allowing the selection of a locally-hosted file with the format:
source_name hh:mm:ss.s dd:mm:ss.s epoch [vel velframe velconv]
...
This file may have any number of sources, with one source listed per line, along with its RA (in hh:mm:ss.s format), Dec (in dd:mm:ss.s format), and coordinate Epoch separated by spaces. The Epoch must be one of those supported by the scheduler; currently these are
J2000,B1950,AzElandGalactic. The velocity of each source can optionally be specified in km/s, along with the velocity frame (one ofLSRorBary), and the velocity convention (one ofRadio,OpticalorZ).Click the
Submitbutton to load in this file. After the file is loaded, a Source Selection frame will appear to the right of the Scan Parameters, and each source will be listed, with buttons for each source in the file. Clicking on the button labelled with the source name will insert that source into the schedule at the currently selected scan number, and move all subsequent scans down by one. Clicking theAddAllbutton will add all the scans to the schedule, in order, at the currently selected scan number, and will move all subsequent scans down by the number of sources in the Source Selection frame. The sources that are added will have the same scan parameters and frequencies that the currently selected source has.SchedSelecting this tab will show the schedule editing functions.
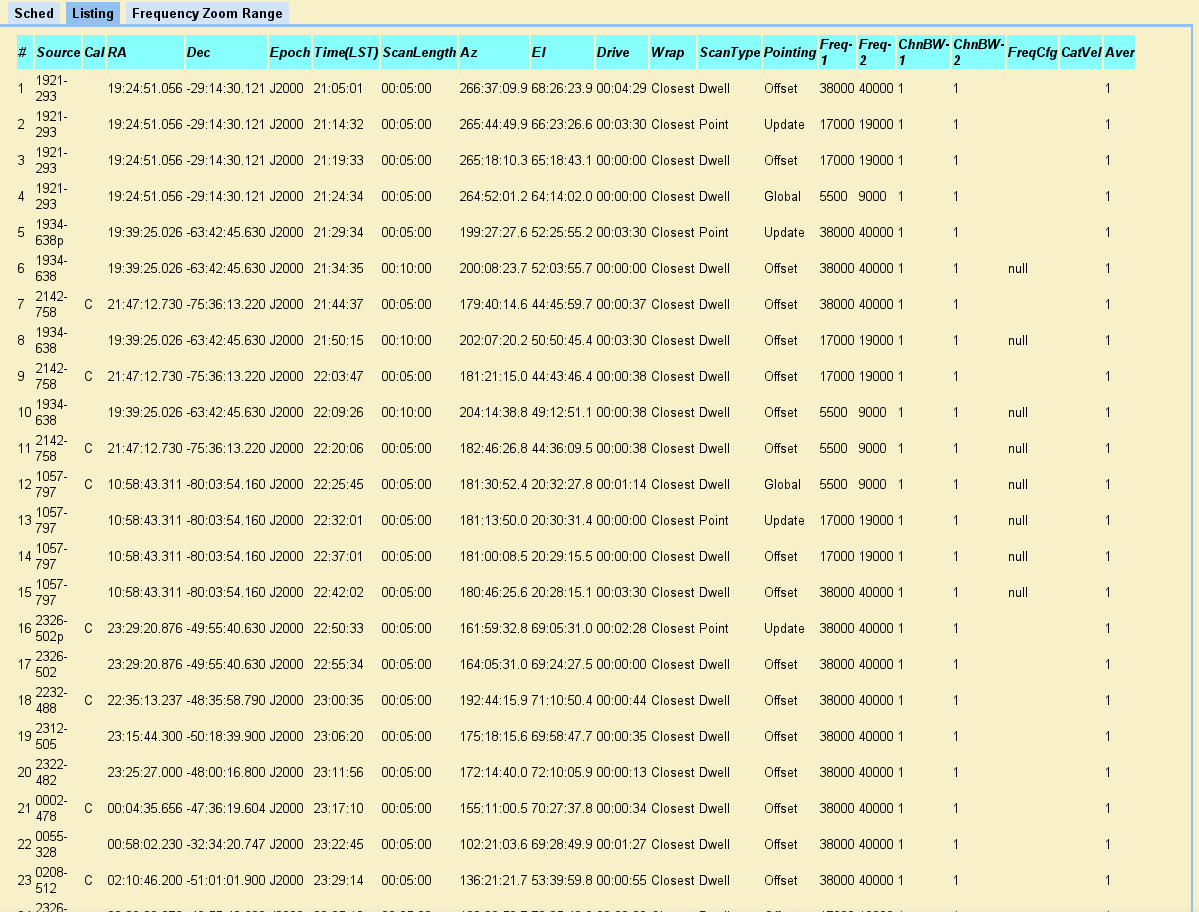
ListingSelecting this tab will generate a time-ordered summary of scans from the current schedule. It is most useful for checking the validity and correctness of the schedule. It will look something like Figure F.4.
For each scan in the schedule, the listing view gives the following information.
#The scan number in the schedule.
SourceThe name of the source.
CalThis column will be blank if the calibrator code is not set, or
CorBif the appropriate calibrator code is set.RAThe right ascension of the scan.
DecThe declination of the scan.
EpochThe epoch of the position.
TimeThe time at the start of the scan. If the
TimeCodeof the schedule is LST then this is shown as LST; likewise with UTCTimeCodes.The time at the start of the first scan is always the same as is specified in the
Timefield for that scan. For subsequent scans the time here includes the time spent on the previous scan and the time required to slew from the previous position to this position.Note that it will not necessarily be accurate when the previous scan is a pointing, paddle or mosaic scan, where the
ScanLengthis not necessarily representative of the actual time spent on the scan.ScanLengthThe length of the scan, in hours, minutes and seconds listed as
hh:mm:ss. This is only what is listed in the scheduler, and does not consider the actual amount of time that will be spent on the scan if it is a mosaic, pointing or paddle scan.AzThe azimuth of the source at the time listed in the
Timecolumn, in degrees, minutes and seconds.ElThe elevation of the source at the time listed in the
Timecolumn, in degrees, minutes and seconds.DriveThe time required to slew to the source from the previous scan position. For the first scan, the drive time is the time required to slew from the stow position.
If the elevation of the source is below 12° then the drive time is shown as
00:00:00because of course the telescope cannot perform the scan.WrapThis column will only be present if the scheduler is in the advanced view mode. The wrap that is specified in the scheduler
Wrapis displayed here; it does not compute what the wrap will actually be during the observations.ScanTypeThe type of scan (eg. dwell, point, paddle etc.).
PointingThe pointing solution to use for the scan.
Freq-1The centre frequency of the CABB continuum IF1, in MHz.
Freq-2The centre frequency of the CABB continuum IF2, in MHz.
ChnBW-1The width of each continuum channel in IF1, in MHz. This column will only be present if the scheduler is in the advanced view mode.
ChnBW-2The width of each continuum channel in IF2, in MHz. This column will only be present if the scheduler is in the advanced view mode.
FreqCfgThis column will show whether the scan has been assigned as a master frequency scan, or if it is slave to another scan. If the column is blank, or
nullthen it is neither a master or a slave.This column will only be present if the scheduler is in the advanced view mode.
CatVelThe velocity as specified in the scheduler's
CatVelfield. This column will only be present if the scheduler is in the advanced view mode.AverThe number of cycles that will be averaged together for this scan. This column will only be present if the scheduler is in the advanced view mode.
The scheduler has three drop-down menus, which are described below.
FileThe
Filemenu has the following items.OpenOpens a pre-existing schedule from the server.
SaveSaves the schedule with the name that it already has. If the schedule does not currently have a name, this action will not work. This action saves the schedule to the server, ready for loading in caobs.
SaveAsAllows the schedule to be saved with a different name than it currently has. If the schedule does not currently have a name, this action is the only way to save it to the server.
OpenLocalLoad a schedule that you have saved on your local computer (instead of from the common schedule area that caobs can access). When this action is selected, a file selection area will appear at the bottom of the scheduler screen asking you to
Select schedule file. Use theBrowsebutton to find the schedule you want to load and then click theSubmitbutton, or press theCancelbutton to cancel this action.SaveLocalSaves the schedule to your local computer (instead of to the common schedule area that caobs can access). Use this option if you're not ready to, or not able to (due to ATNF access restrictions) save to the remote server. You will be prompted to save a file called
cabb.schon your local disk.CloseCloses the current schedule and resets the interface back to an empty schedule with 1 generic scan and no schedule name.
EditThe
Editmenu has the following items.CutRemoves the currently selected scans from their position in the schedule, but keeps it in memory so that they can be inserted elsewhere.
CopyCopies the currently selected scans into memory so that they can be inserted elsewhere.
PasteCopies the scan information held in memory from a prior
CutorCopyaction back into the schedule, as scans after the currently selected scan. This moves all subsequent scans down by the number of scans that are pasted in. It is not possible toPastea scan into position 1 in the schedule.
ToolsThe
Toolsmenu has the following items.Advanced ViewThis menu item will only be present if the scheduler is currently in “Simple View”. Selecting it will make the scheduler display more fields than are strictly required to make a simple schedule.
Simple ViewThis menu item will only be present if the scheduler is currently in “Advanced View”. Selecting it will make the scheduler display on the fields that are strictly required to make a simple schedule. However, all of the advanced fields will retain their settings irrespective of the scheduler view mode.
Global changeAllows a change in one scan to be duplicated in all other scans. The scan/scans to change should be selected first, followed by the
Global changemenu item. While the global change mode is activated, it is not possible to change the set of selected scans. Make as many changes to the scan as is necessary, in any of theScan Parameters,Freq1andFreq2tabs, and then select either theGlobal Applybutton to confirm the changes and duplicate them in all the other scans in the schedule, or theGlobal Cancelbutton to keep the changes but do not duplicate them.The button
Global Apply Selectedis used to effect the changes only to the scans that were selected before entering global change mode.The button
Global Apply Matchingis used to duplicate the changes only to other scans that initially matched the scan being changed. An example of this is for a schedule that has multiple frequencies in a single IF. Consider a schedule that has scans with IF1 frequencies of 5500, 5700 and 8600 MHz. If a scan with an IF1 frequency of 8600 MHz is changed to 8700 MHz, and theGlobal Applybutton is used, then all scans in the schedule will be changed to have an IF1 frequency of 8700 MHz. However, if theGlobal Apply Matchingbutton is used, then only scans that have an IF1 frequency of 8600 MHz, like the selected scan, will be changed.It is also important to note that if nothing changes, then using the
Global Applybutton will not do anything. For example, if a scan is changed individually fromProject=C123toProject=C124, and this change needs to propagate to all scans, then simply deleting the entry in this scan and replacing it with the same thing while inGlobal changemode will not work, as it will still appear as though the entry has not changed. Instead, move to another scan where theProjectcode has not changed before enteringGlobal changemode.Another important caveat is that even though more than one scan can be selected before entering global change mode, only the parameters of the first selected scan will be displayed in the scheduler fields.
Recalc freq/veloGoes through the schedule and recomputes all frequency and velocity information present. This is useful to execute when you change the
Datefield, to ensure that all the zoom mode information is correct.Load local catalogUse this menu item to load a catalogue of sources from a local machine into the scheduler, which can then be inserted into the schedule with the
Pick Sourcebutton.If the
Pick Sourcebutton is used before a local catalog is loaded, then a frame allowing a catalog is shown. However, after this catalog is loaded, subsequent selections of thePick Sourcebutton will display only theSource Selectionframe. To show the catalog loading frame again, so that a different catalog can be loaded, use theLoad local catalogmenu item.Load remote catalogUse this menu item to load a catalogue of sources from the remote database into the scheduler, which can then be inserted into the schedule with the
Pick Sourcebutton. These remote catalogues include the VLA and AT calibrator catalogues, among others.
Use new cal databaseIf this menu item is present, then the
Search Calbutton will be querying the old calibrator database for calibrator positions and fluxes. Selecting this menu item will make the web scheduler query the new calibrator database whenever theSearch Calbutton is pressed.Use old cal databaseIf this menu item is present, then the
Search Calbutton will be querying the new calibrator database for calibrator positions and fluxes. Selecting this menu item will make the web scheduler query the old calibrator database whenever theSearch Calbutton is pressed.